Enriching product reviews with Apache Kafka® and Amazon SageMaker
Ever wondered how to enrich your real-time streaming data with machine learning-driven analysis?
Are you on the lookout for events, anomalies, or just want automated heads-up on what's going on? You can use machine learning to get insights and make smarter decisions. By adding machine learning to your live data setup, you open up lots of analysis possibilities.
In this guide, we'll walk through an example using Amazon SageMaker Studio, a model and a Code Editor space to upgrade streaming data from an Apache Kafka® topic. Specifically, we'll be working with Amazon fine food reviews, adding categorisation and sentiment information as the data flows through Kafka. The results will be split into two topics: one for successful transformations and one for any issues that we encounter.
Repository
To make things easier for you to run, I've prepared a repository where you find multiple Jupiter notebooks with all code snippets that you need for this project. Instead of writing the code or copying snippets manually, you can simply clone the repo and run notebooks steps. Below I'll explain how to clone it within a SageMaker Code Editor space to use this repository alongside models that are deployed to SageMaker.
Data
For this tutorial we'll be using a dataset of reviews of fine foods from Amazon. Download the Reviews.csv file from Kaggle and keep it handy, once we set up Code Editor space, add the file to the project folder.
Alternatively, feel free to adapt the tutorial for any data stream that you already have in place.
Step 1 - Set up Amazon SageMaker and Code Editor spaces
In this tutorial we'll be using SageMaker Studio for hosting AI models and running code.
To get started with Amazon SageMaker the best is to follow the Amazon SageMaker documentation.
Create a Code Editor space
One of the convenient tools SageMaker Studio offers is Code Editor. Code Editor spaces are based on open source Visual Studio Code and allow to write, run and debug analytics code. They also allow an easy integration with the SageMaker models.
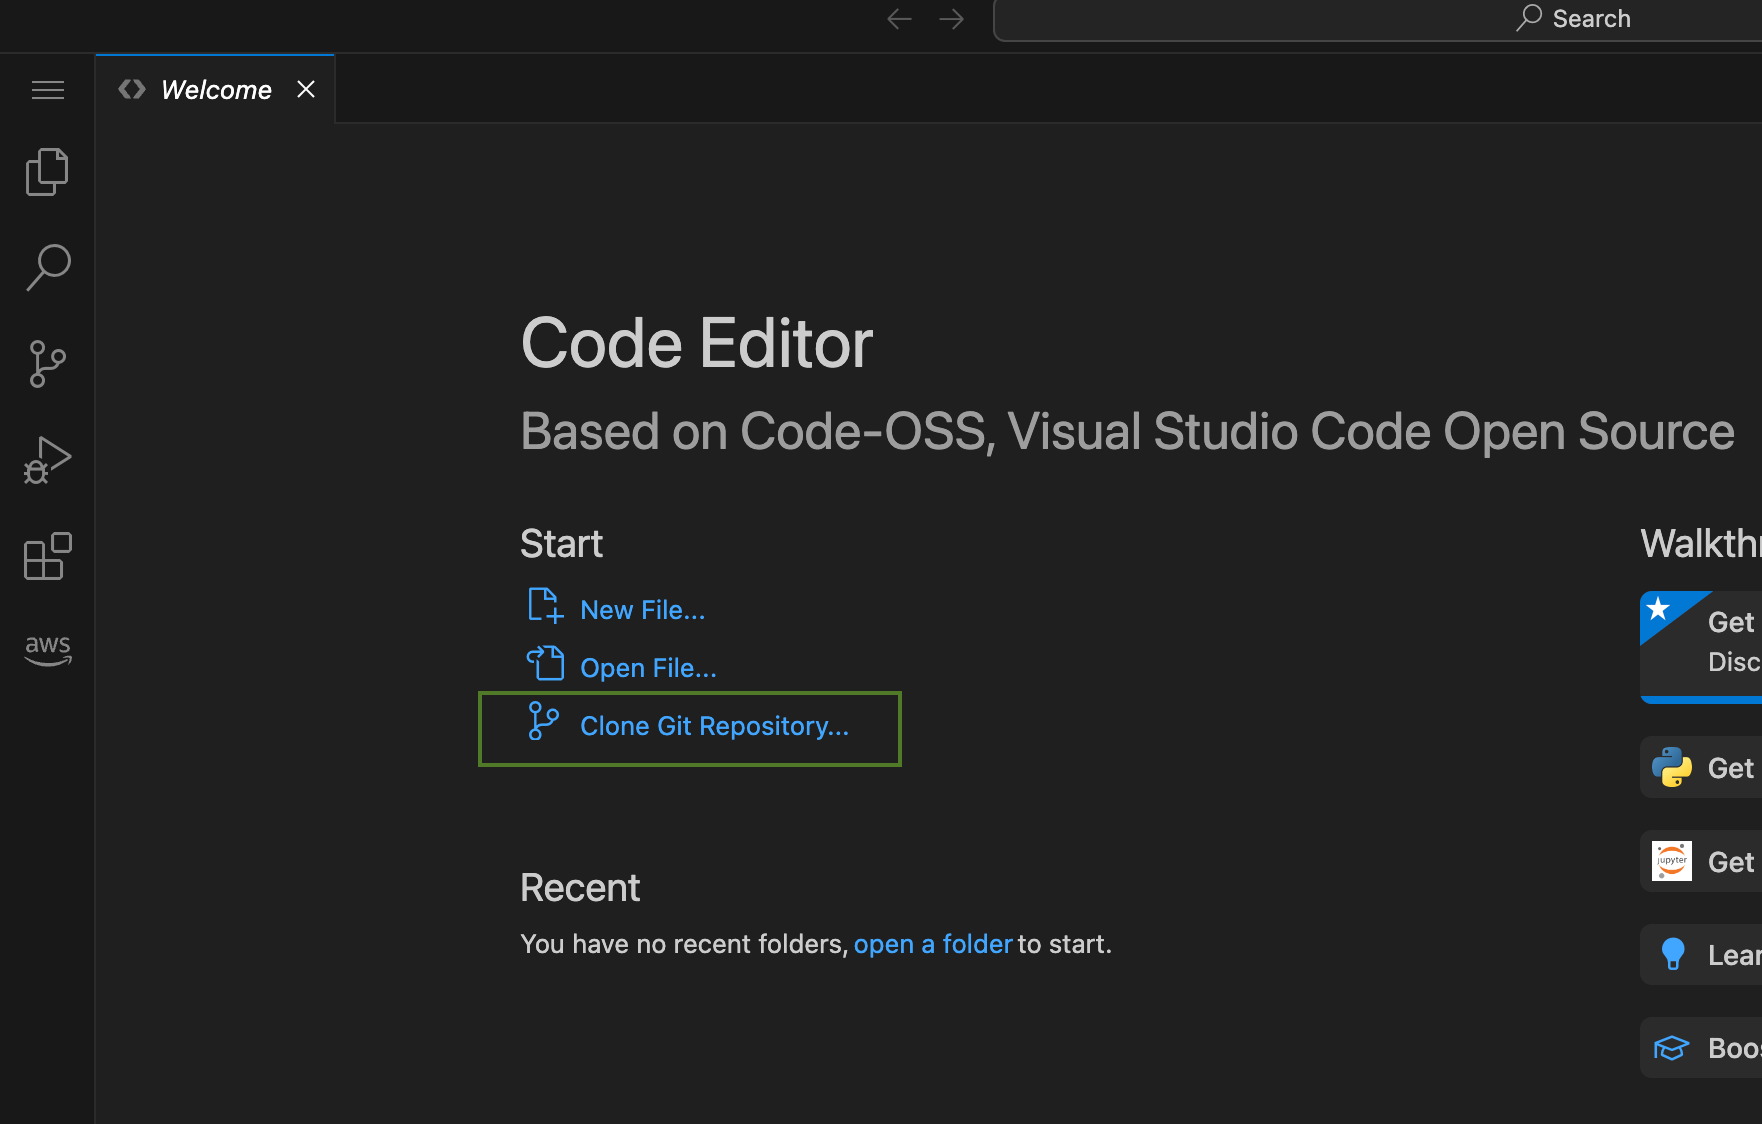
To create a Code Editor space go to Code Editor page and click on Create Code Editor space:

Choose the name, wait till the space is deployed and run it. Then click to open a Visual Studio Code interface.
Here you can clone the repository with the code we'll need:
Once the repository is cloned, move here the Reviews.csv file.
Step 2 - Set up an Apache Kafka cluster
If you don't have an Aiven account yet, create it by following these steps. By registering you'll also get free credits that you can use to run this tutorial. Once registered, proceed to the console and create a new Aiven for Apache Kafka service.
Establish a secure connection to Apache Kafka
To access an Apache Kafka cluster and establish a TLS connection you need to have this information about your cluster:
- service URI of your Apache Kafka cluster
- files containing access key, access certificate and CA certificate of your Apache Kafka services.
All of those you can get from the landing page of your service:
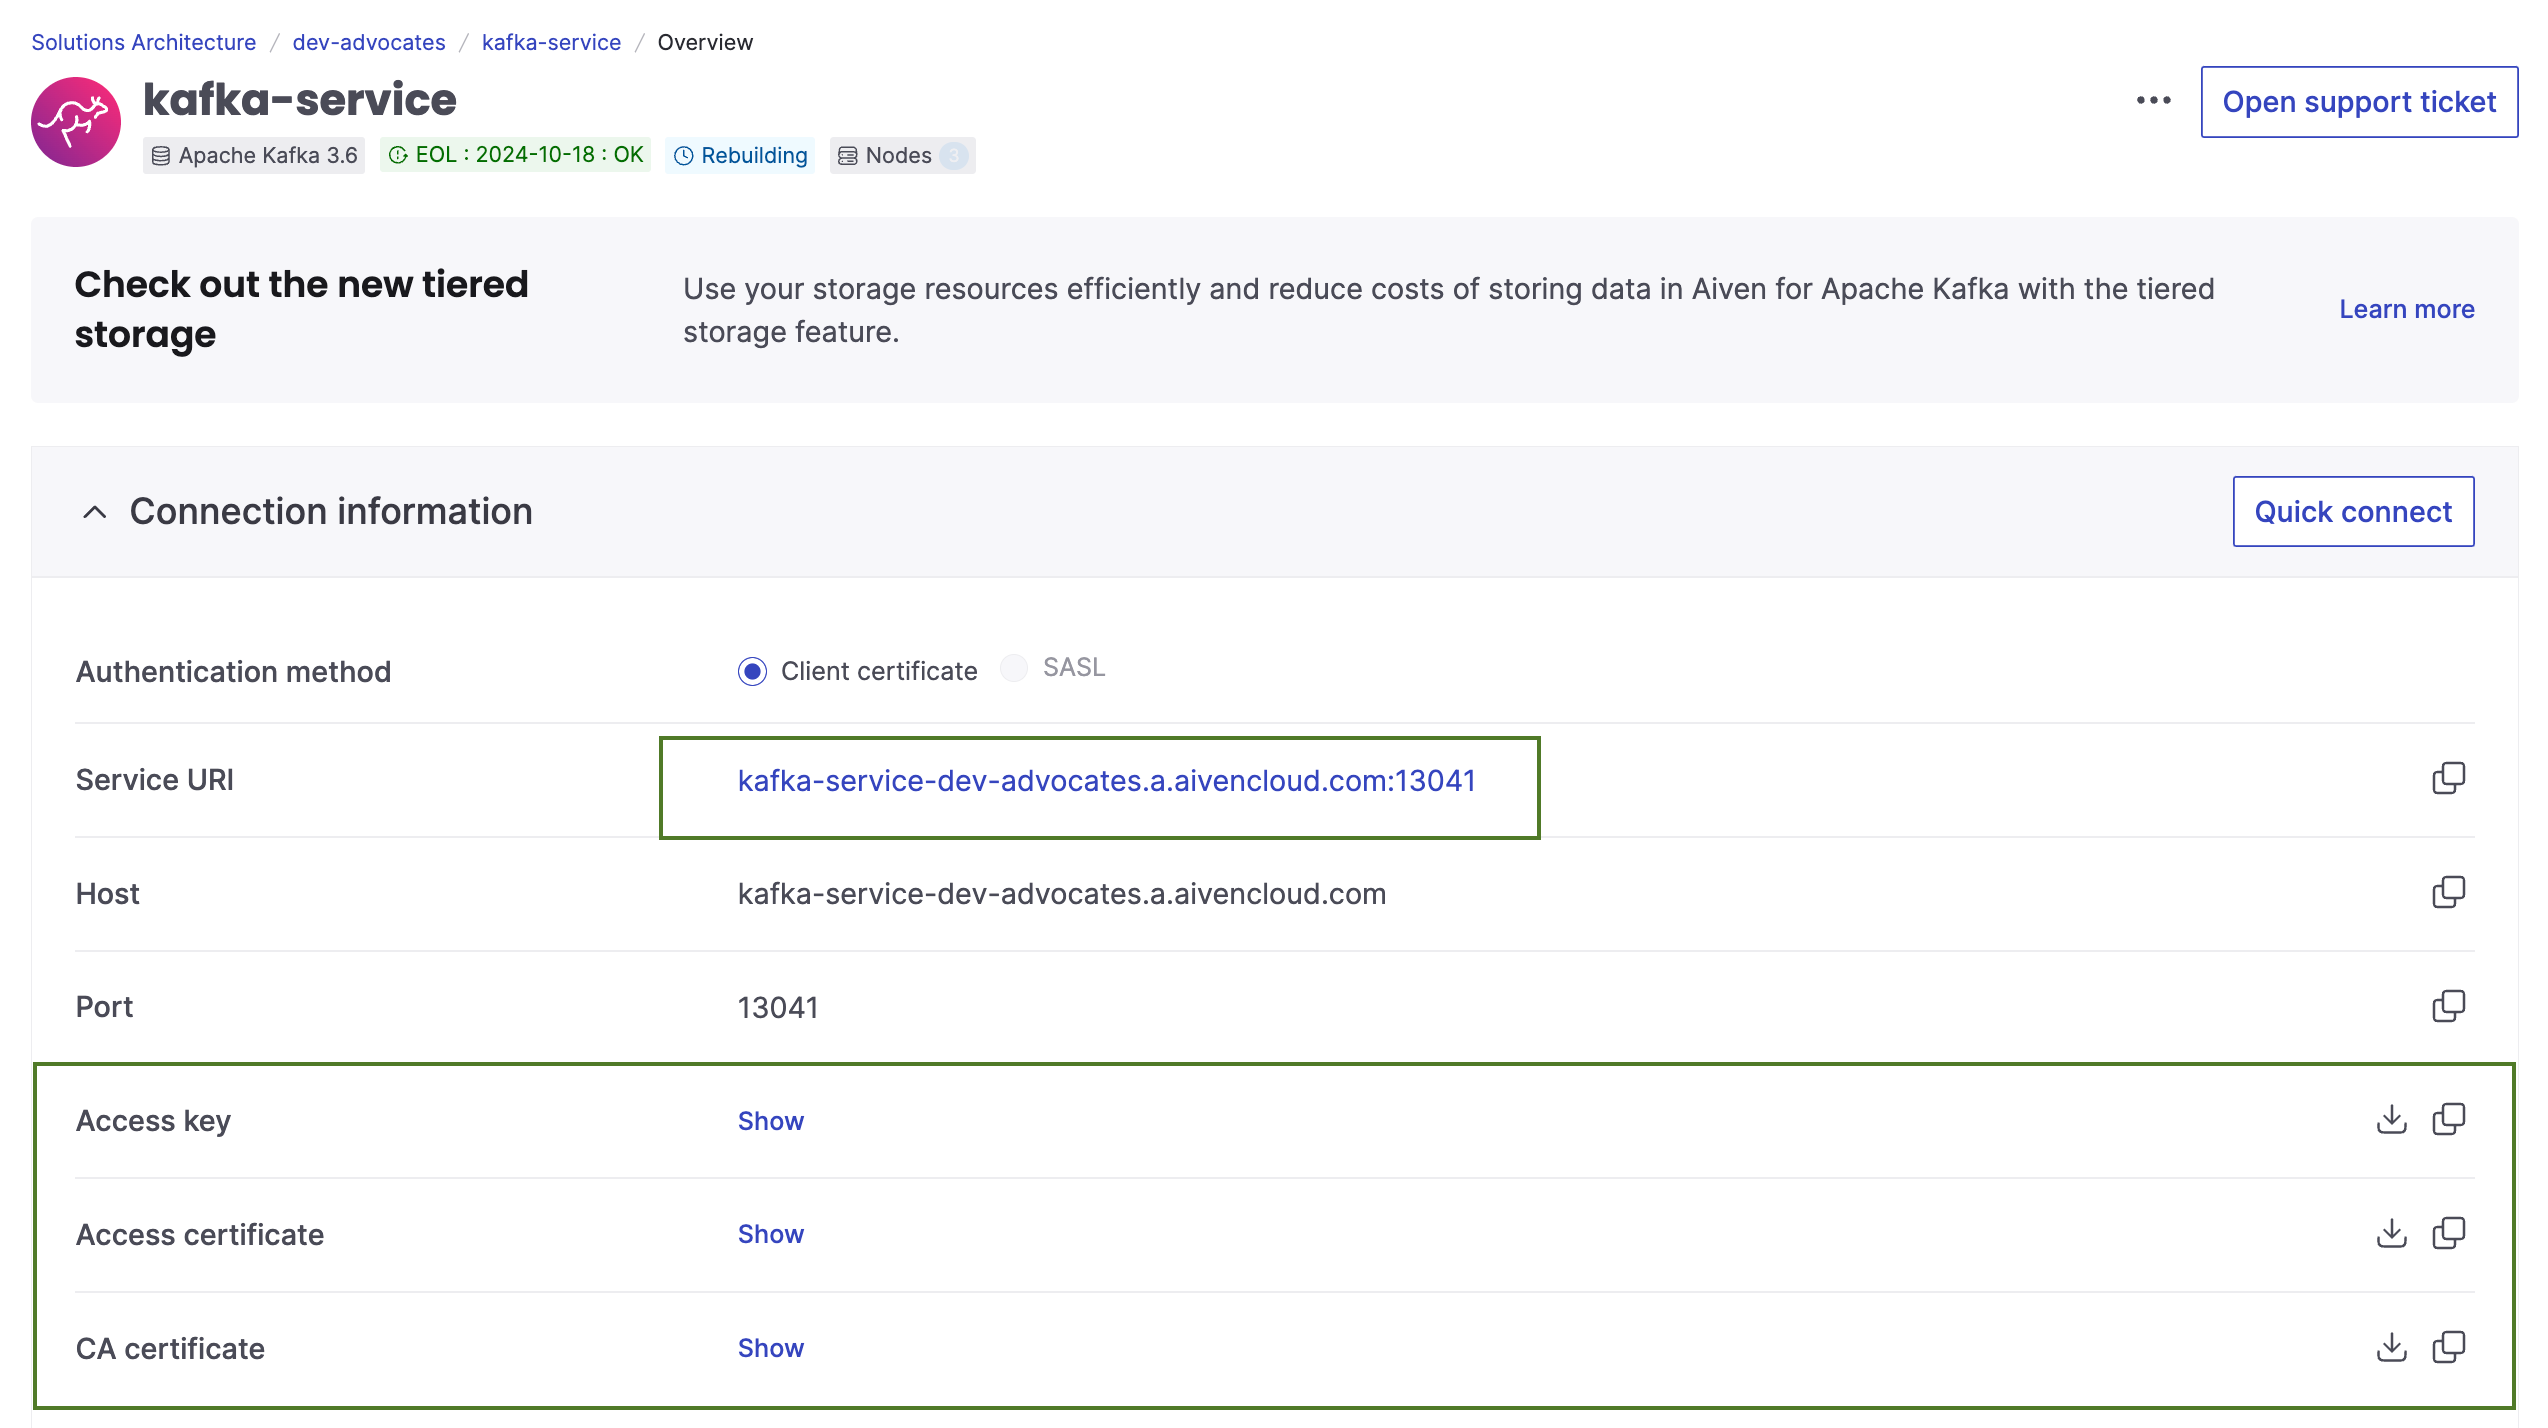
Download the files and add them to the certificates folder. Keep the service URI handy, we'll need it in the next steps.
Add topics
Once the cluster is deployed and ready, go to Topics tab and add the following topics:
- reviews - a topic with the raw review data
- reviews_enriched - to be filled in with the analysis result
- reviews_processing_errors - to collect information about any errors during data analysis.
Input data generation
Time to load review data into an Apache Kafka topic. We'll use some python for this! You can run the script directly from Jupiter notebook load-reviews.ipynb.
First install confluent_kafka library to work with Apache kafka:
!pip install confluent_kafka
Next set your apache_kafka_uri in the code and run:
import csv import json from confluent_kafka import Producer, Consumer, KafkaError # to produce and consume data from Apache Kafka topics import ssl csv_file = 'Reviews.csv' # SSL context configuration # TODO: Load Apache Kafka certificates into certificates folder apache_kafka_ssl_config = { 'ssl.ca.location': 'certificates/ca.pem', 'ssl.certificate.location': 'certificates/service.cert', 'ssl.key.location': 'certificates/service.key', 'security.protocol': 'ssl', } apache_kafka_uri = '' # TODO: Set URI for Apache Kafka apache_kafka_input_topic_name = 'reviews11' producer = Producer({ 'bootstrap.servers': apache_kafka_uri, **apache_kafka_ssl_config }) # Read CSV file and send records to Kafka topic with open(csv_file, newline='', encoding='utf-8') as csvfile: reader = csv.DictReader(csvfile) for row in reader: # Convert each row to a JSON object record = { 'Id': row['Id'], 'ProductId': row['ProductId'], 'UserId': row['UserId'], 'ProfileName': row['ProfileName'], 'HelpfulnessNumerator': row['HelpfulnessNumerator'], 'HelpfulnessDenominator': row['HelpfulnessDenominator'], 'Score': row['Score'], 'Time': row['Time'], 'Summary': row['Summary'], 'Text': row['Text'] } to_encoded_json = json.dumps(record).encode('utf-8') producer.produce(apache_kafka_input_topic_name, to_encoded_json) producer.flush()
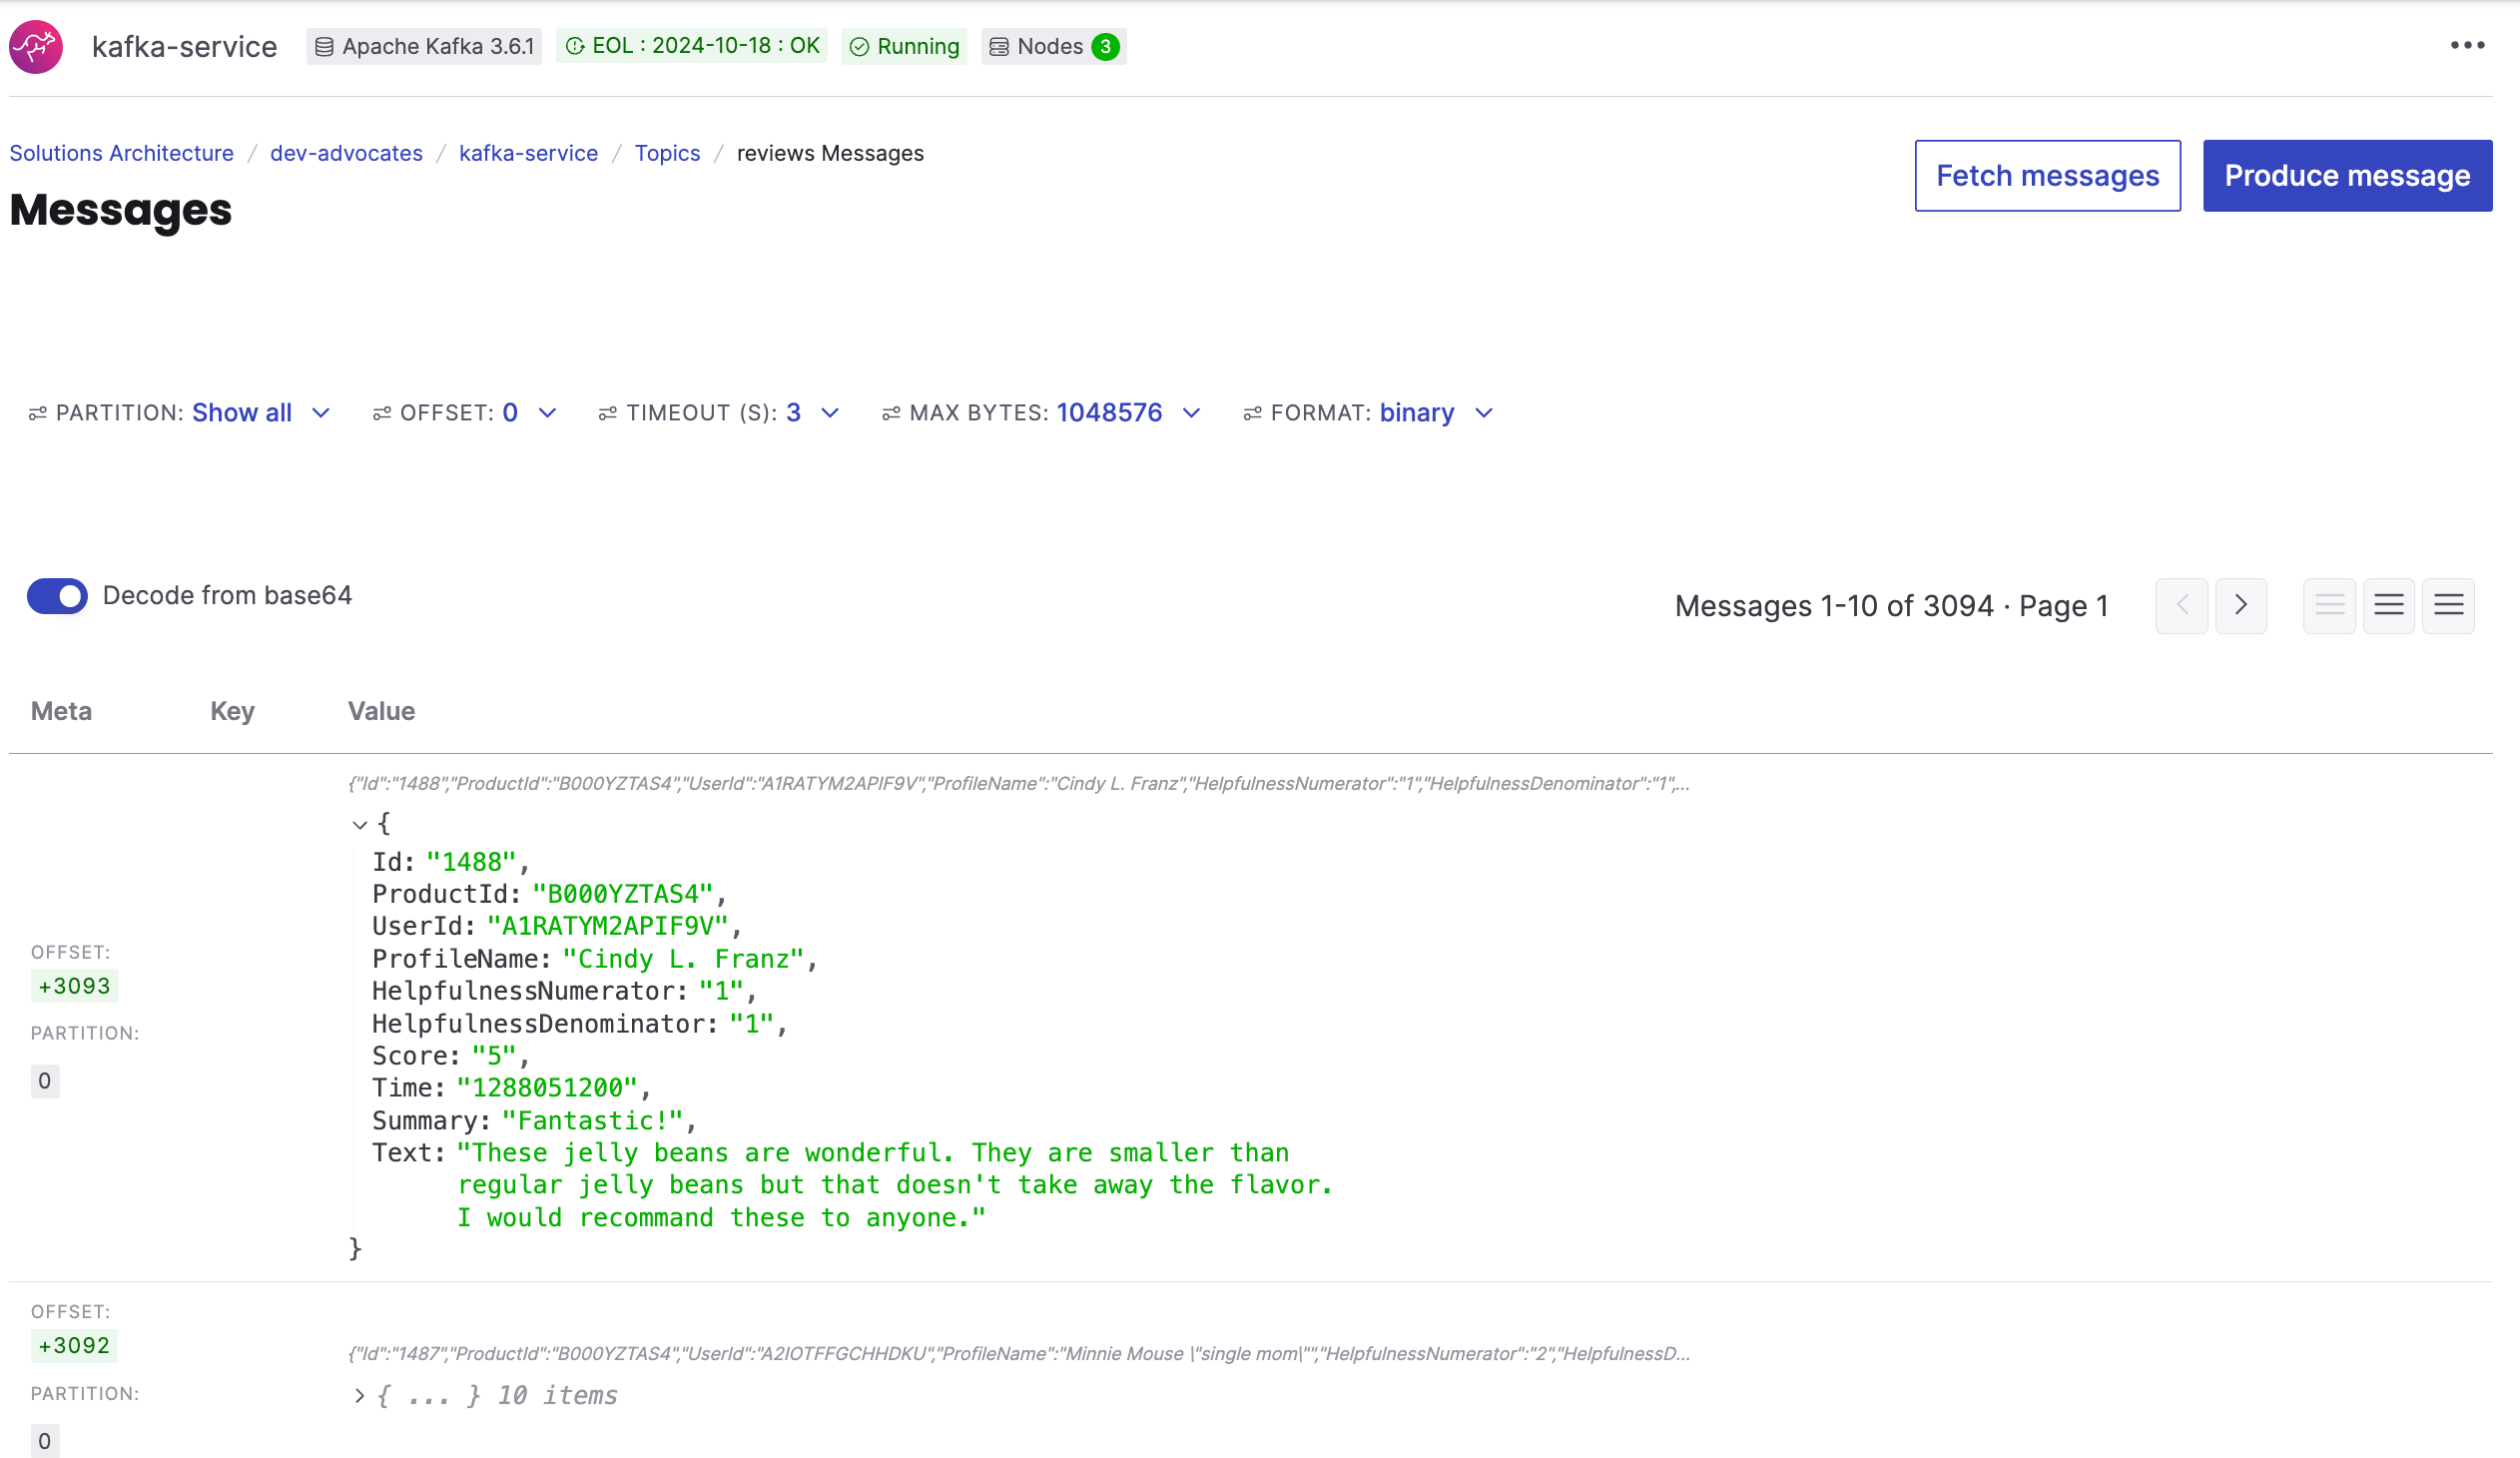
The reviews are now being loaded into the Apache Kafka topic reviews. You can already check the messages there by using Aiven console interface. Just go to the topic information and fetch messages:
While this is in progress we can move on and work on the next steps.
Step 3 - Deploy models
In this project we'll do two enhancement to our data:
- Run sentiment analysis and predict if a message is positive or negative
- Predict a category of a product that is being reviewed.
Sentiment analysis
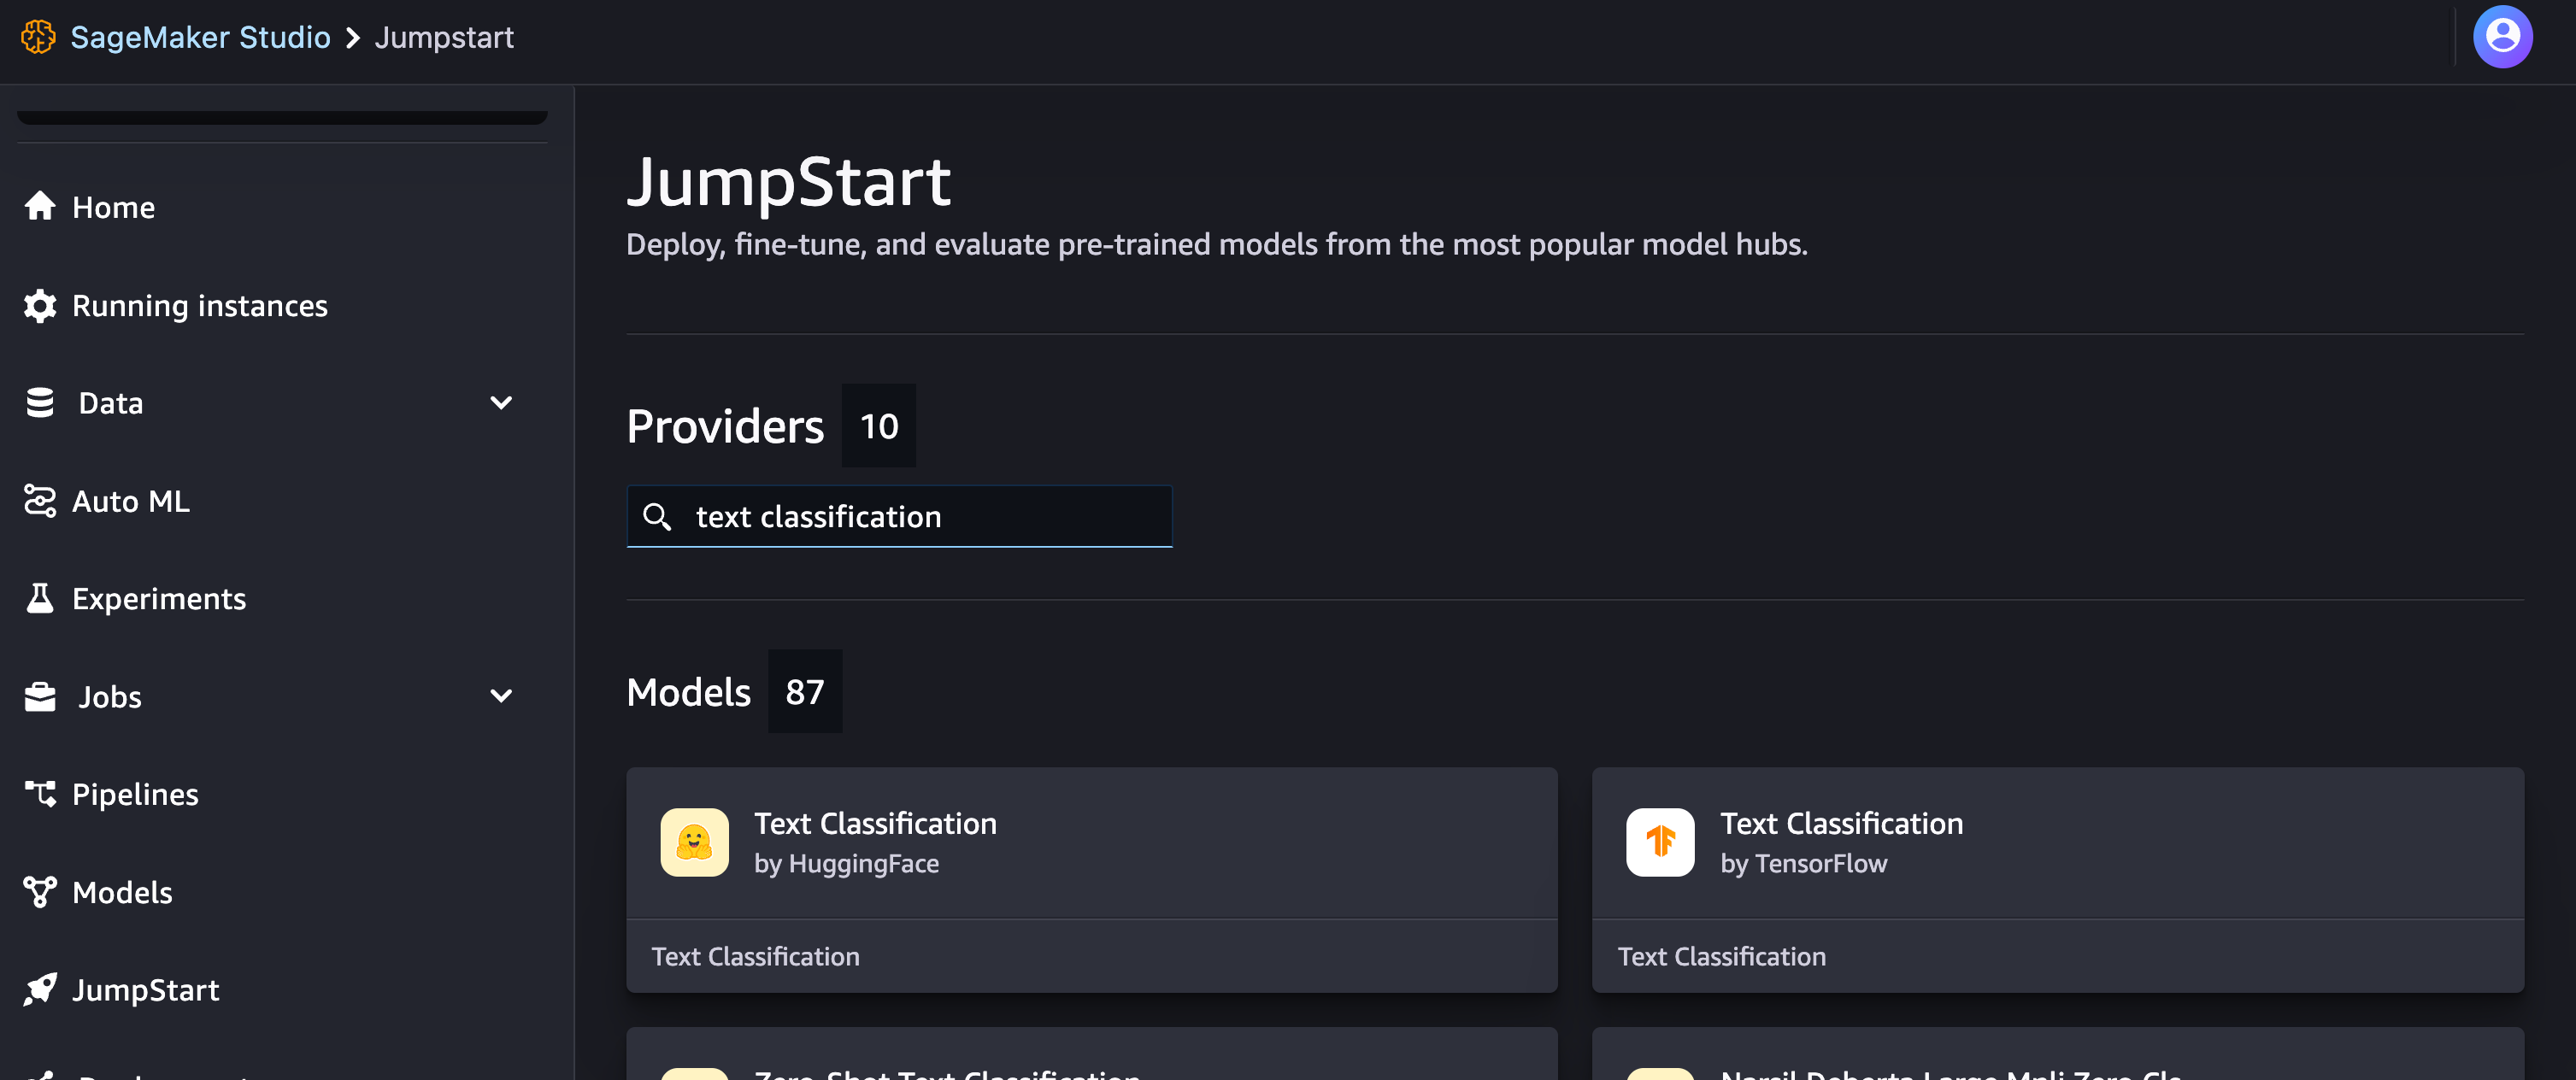
For sentiment analysis we'll use AI and a model that is already available in the JumpStart section. Go to JumpStart page and search for "text classification":
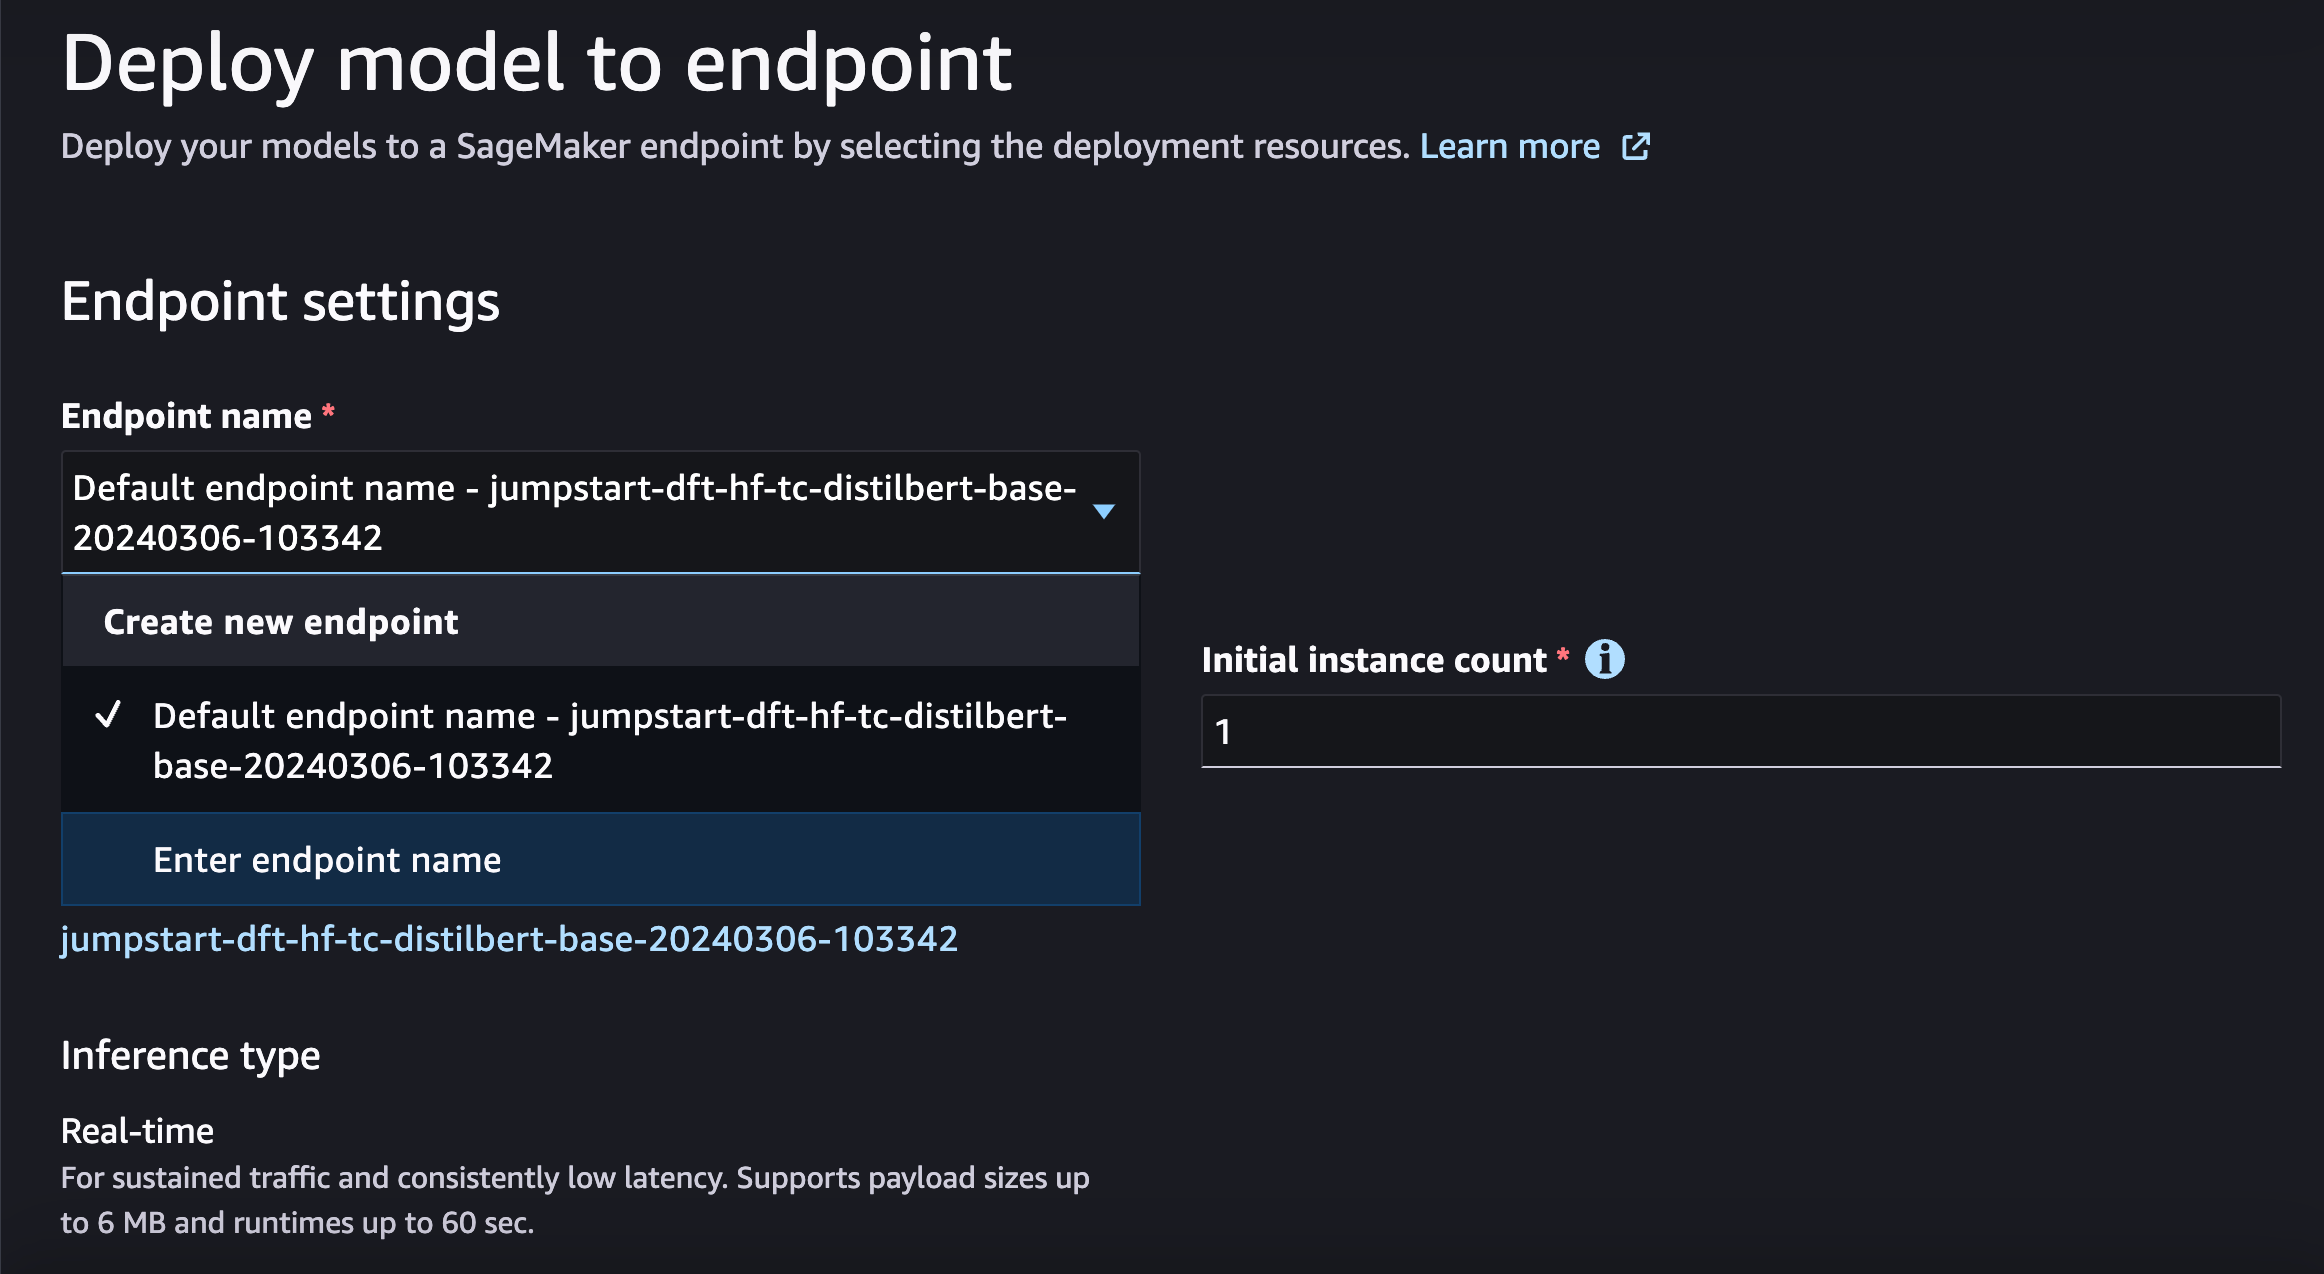
For this tutorial select the first option Text Classification by HuggingFace and proceed to deploy it. I'd also recommend changing the endpoint name to easily find it later. For example, I called the endpoint jumpstart-text-classification:
Category prediction
Next, we want to get a model that can predict most fitting categories of the product. For this we'll select another model that is already available via JumpStart, a zero-shot text classification model:
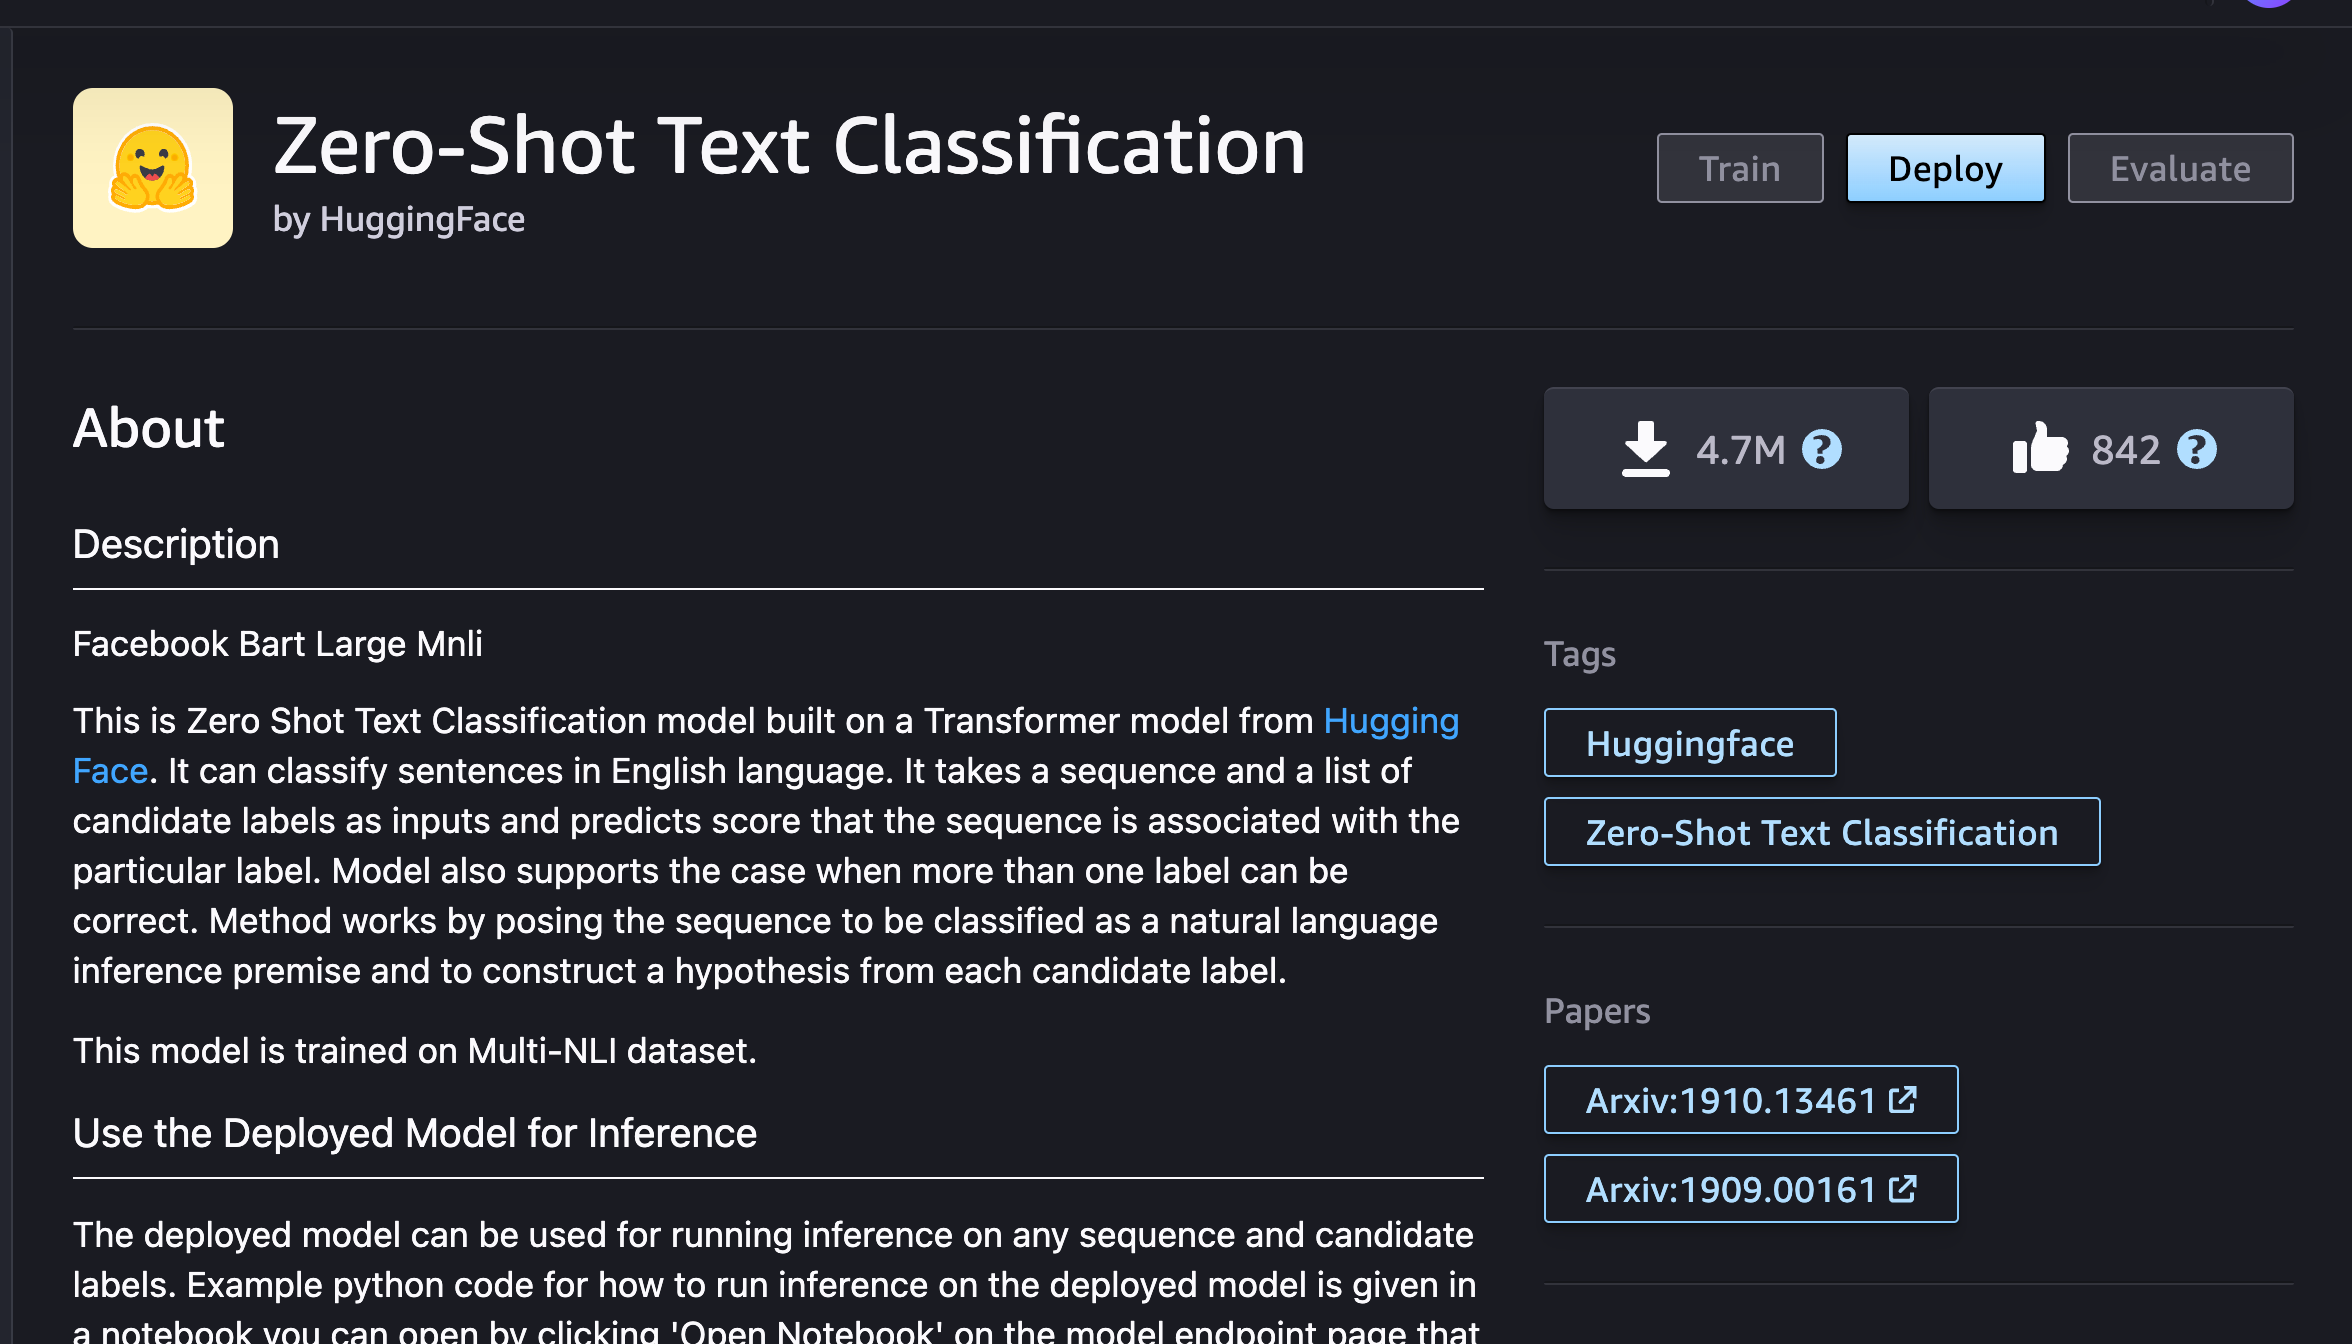
Deploy similarly to how we did it with the previous model. For the endpoint name use jumpstart-zero-shot.
Step 4 - Transform data and check the results
Now that we have original review data flowing into Apache Kafka topi and AI models are running, time to process record by record and perform analysis on them.
Run the steps from the process-amazon-reviews.ipynb.
Install dependencies and import the libraries:
!pip install confluent-kafka from confluent_kafka import Producer, Consumer, KafkaError # to produce and consume data from Apache Kafka topics import boto3 # to programmatically create, configure, and manage AWS resources import json # to work with social media messages that are represented as JSON objects import re # for helper functionality to clean HTML tags from social media messages
To work with the text classification model we need to define a mapping dictionary to map model labels to negative/positive label:
label_mapping = {'LABEL_0': 'negative', 'LABEL_1': 'positive'} def get_prediction(text): endpoint_name = 'jumpstart-text-classification' # TODO: Set endpoint name of your model for sentiment analysis client = boto3.client('runtime.sagemaker') query_response = client.invoke_endpoint(EndpointName=endpoint_name, ContentType='application/x-text', Body=text, Accept='application/json;verbose') model_predictions = json.loads(query_response['Body'].read()) probabilities, labels, predicted_label = model_predictions['probabilities'], model_predictions['labels'], model_predictions['predicted_label'] # Map the predicted_label to your the label using the mapping dictionary predicted_label = label_mapping.get(predicted_label, predicted_label) return probabilities, labels, predicted_label
To predict categories of products with a help of a zero shot model we need to provide the model with possible category alternatives:
categories = [ "Snacks", "Coffee", "Beverages", "Condiments", "Canned Goods", "Bakery and Baked Goods", "Dairy Products", "Sweets and Desserts", "Breakfast Foods", "Grains and Pasta", "Protein Products", "Frozen Foods", "Health and Nutrition", "Baby and Toddler Food", "Pet Supplies", "Fruits and Vegetables", "Herbs and Spices", "Beverage Accessories", "Cooking Oils and Fats", "Ethnic and Specialty Foods", "Dietary Supplements" ]; def get_categories(text): endpoint_name = 'jumpstart-zero-shot' # TODO: Set endpoint name of your model for classification client = boto3.client('runtime.sagemaker') model_input = {"sequences": text, "candidate_labels": categories, "multi_class": True} query_response = client.invoke_endpoint( EndpointName=endpoint_name, ContentType='application/json', Body=json.dumps(model_input), Accept='application/json;verbose' ) model_predictions = json.loads(query_response['Body'].read()) # Filter categories with probabilities over 60% filtered_categories = [ label_mapping.get(label, label) for label, score in zip(model_predictions['labels'], model_predictions['scores']) if score > 0.6 ] return filtered_categories
You can test the category prediction with a phrase that combines multiple categories ;)
print(get_categories("very delicious coffee for my cat who likes to snack on tiramisu"))
Now that we have functionality to run models, we can establish connection with Apache Kafka to read review records and process them.
Define Apache Kafka connection properties:
# TODO: Load Apache Kafka certificates into certificates folder apache_kafka_ssl_config = { 'ssl.ca.location': 'certificates/ca.pem', 'ssl.certificate.location': 'certificates/service.cert', 'ssl.key.location': 'certificates/service.key', 'security.protocol': 'ssl', } apache_kafka_uri = '' # TODO: Set URI for Apache Kafka apache_kafka_input_topic_name = 'reviews' apache_kafka_enriched_output_topic_name = 'reviews_enriched' apache_kafka_processing_errors_topic_name = 'reviews_processing_errors'
Create an Apache Kafka consumer:
consumer = Consumer({'bootstrap.servers': apache_kafka_uri, 'group.id': 'mygroup', 'auto.offset.reset': 'earliest', **apache_kafka_ssl_config}) consumer.subscribe([apache_kafka_input_topic_name]) CLEANR = re.compile('<.*?>') def get_clean_content(json_object): content = json_object.get("Text", "") # Retrieve 'content' property only_text = re.sub(CLEANR, '', content) return only_text
Create an Apache Kafka producer:
producer = Producer({ 'bootstrap.servers': apache_kafka_uri, **apache_kafka_ssl_config }) # Send a message to a Kafka topic def send_message(message, topic_name): producer.produce(topic_name, json.dumps(message).encode('utf-8')) producer.flush() def send_enriched_data(message, probabilities, predicted_label, key_categories): message['probabilities'] = probabilities message['sentiment_predition'] = predicted_label message['categories'] = key_categories send_message(message, apache_kafka_enriched_output_topic_name) def report_processing_error(message, error_code, error_message): message['processing_error_code'] = error_code message['processing_error_message'] = error_message send_message(message, apache_kafka_processing_errors_topic_name)
Finally read messages from the Apache Kafka reviews topic and push processed data back to reviews_enriched topic:
print(f"Processing messages") while True: message = consumer.poll(1.0) # Poll for messages, with a timeout of 1 second if message is None: continue if message.error(): if message.error().code() == KafkaError._PARTITION_EOF: # End of partition event print(f"Reached end of partition for topic {message.topic()} [{message.partition()}]") else: print(f"Error while consuming message: {message.error()}") else: decoded = message.value().decode('utf-8') json_obj = json.loads(decoded) content_property = get_clean_content(json_obj) print(f"Process the messagee: {content_property}") if content_property == "": continue try: probabilities, labels, predicted_label = get_prediction(content_property) key_categories = get_categories(content_property) print(f"Inference:\n" f"Input text: '{content_property}'\n" f"Model prediction: {probabilities}\n" f"Predicted label: {predicted_label}\n" f"Predicted key_categories: {key_categories}\n") send_enriched_data(json_obj, probabilities, predicted_label, key_categories) except Exception as e: print(f"An error occurred: {e}") response = getattr(e, "response", {}) error_code = response.get("Error", {}).get("Code", "Unknown") error_message = response.get("Error", {}).get("Message", "Unknown") report_processing_error(json_obj, error_code, error_message) # Close the consumer consumer.close()
As we did before, you can see the processed messages by going to Aiven console and fetching the messages from reviews_enriched:
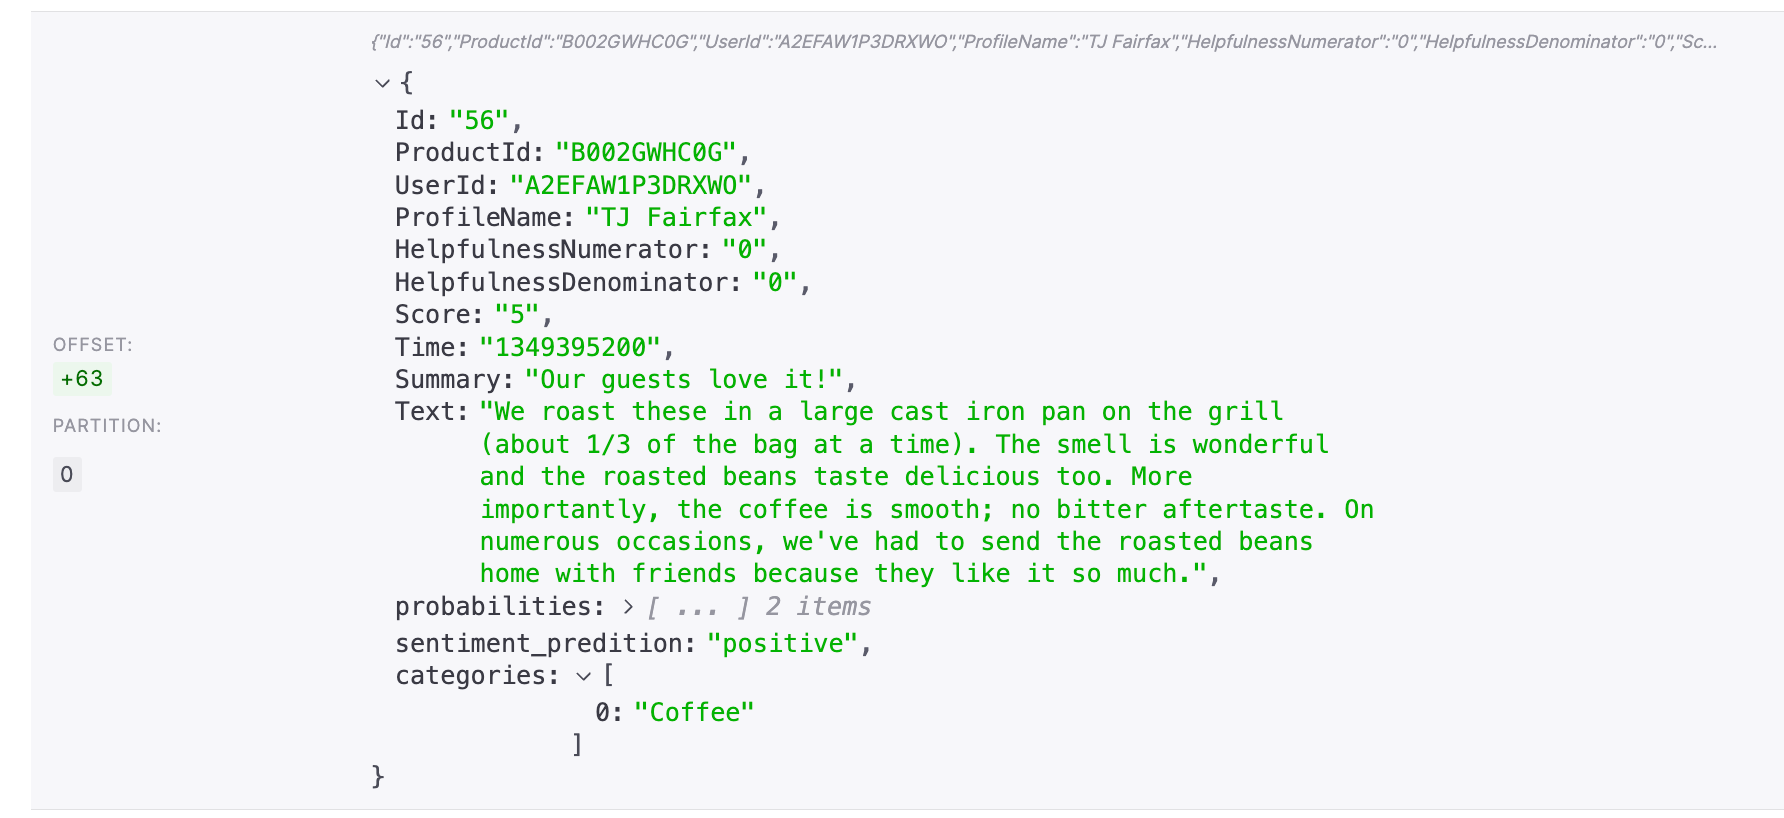
Note, that we now for this record we have a field "Categories" with an item "Coffee".
Clean up
Don't forget to clean up the resources you've used. For Sagemaker you need to remove created endpoint, endpoint configuration, running models and Code Editor spaces. Check https://docs.aws.amazon.com/sagemaker/latest/dg/ex1-cleanup.html for more details.
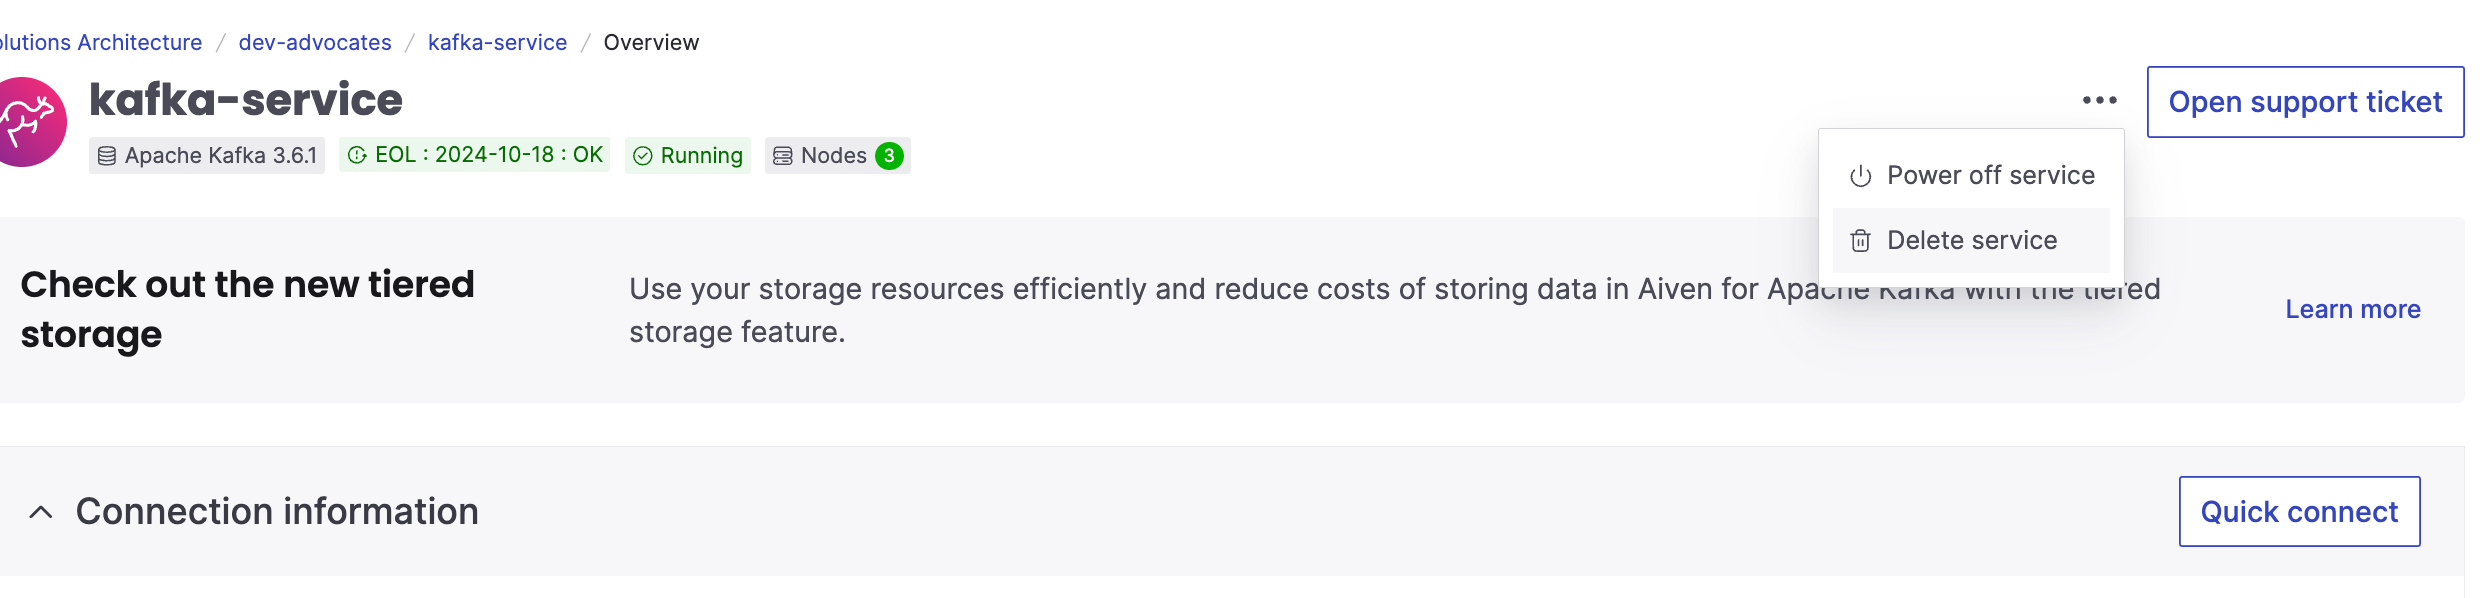
To remove Aiven for Apache Kafka instance, on the landing page of your service in the Aiven console select "Delete service" from the menu:
Next steps
If you're interested in other materials about Apache Kafka, be sure to check out:
- Apache Kafka® as source and sink with Apache Flink® to process streaming data
- Stream Mastodon data to Apache Kafka® using NodeJS and TypeScript
If you're curious to learn more things you can do with Aiven and AI look at: